As a long time Java/Spring and Spring-MVC user, when our team recently needed to build a REST API in Python, we set about trying to see how we can create something as similar as possible to what we are accustomed to (and love!) in Spring MVC. There was a lot learning along the way, so I would like to share the very satisfactory results that we had.
The first decision that we needed to make was which HTTP framework to use. We decided to base our application on Flask, one of the well known, easy to use, libraries for building web servers. On top of that, we used Flask-RESTX, which as their web site indicates it “adds support for quickly building REST APIs”. Flask-RESTX has many features, such as simplified generation of Swagger documentation and HTTP error handling. On top of that, we added Flask-Injector, enabling us to use Dependency Injection, a feature that is so basic for us Spring developers. Dependency injection makes it trivial to mock out our database and other dependencies in unit tests. It also makes it easy to set up a singleton connection or our database which can be used in multiple places in our requests
Now that we have our framework of technologies, we can get started. One of the confusing issues within Flask and Flask-RESTX, for those familiar with Flask, is how to organize our APIs. After trying out namespaces and blueprints, we concluded that for the sake of our Swagger documentation that we will generate, the best approach is to use namespaces.
So a simple API would look as follows:
For each API we define a separate class. Notice doc=False. This will tell Flask-RESTX that we are not interested in including our health check in the generated swagger documentation. Also, note the naming of the function determines the HTTP Method used to invoke this action.
One of the nice features of Spring MVC is the simplicity with which we can set up interceptors or filters of all requests based on regex expressions. While we didn’t find a way to set up interceptors based on regex, the interceptor feature exists for before and after requests and can be used with dependency injection using Flask-Injector.
Here is a simple example:
Our interceptor will log all incoming requests that are not the health check. After all, we do not want every ping of the load balancer to our service to be logged. In addition, on all regular user requests, we will pull the authenticated username (via AWS Cognito before our service is invoked) from the Header. We then query our injected datasource to pull additional user information. Once we have this information we insert it into our context using “g” so that this information will be available to all subsequent request handling.
There are two steps missing here to make this work, initialization of our datasource and registering our before (and after) request interceptor. Both of these happen as part of the code needed to initialize our Flask application. These steps include:
Create the flask app
Using the Flask Object created, add interceptors
Create a Class to inherit from injector’s module class to register all our singletons like our database connection for injection
Before we get to this, we will create our flask restx API. As we found in other sample projects we create this in our __init__.py file at the top of our modules of all our requests:
Just as you see we added our health check you can add the rest of your namespaces here. Now, using this flask_restx we can complete our initialization:
The bottom function create_run_time_flask() shows how we put together all the initializations in this file. This function is used for runtime (as we run using gunicorn via Docker) whereas a similar function creating mocks for injection is used in our unit test module. In the unit test module, once we have our app set up, we use our flask_app.test_client to send all our REST requests.
When AWS introduced Athena, we started moving more and more of our business use to it. Athena meant that we no longer had to raise an EMR to query our parquet files and can easily play with with writing queries anytime and even save them. We even introduced CloudWatch scheduled jobs to run queries and email out reports.
However, when we started building a pipeline for processing data we quickly hit a ceiling of maximum concurrent queries allowed by Athena which is defined on an account basis! You can see the limits here. Notice how low they are! We soon realized that Athena may be problematic for automated pipelined with concurrent processes.
The good news is that once you have defined tables in Athena, these tables are automatically in the Glue Catalog of your AWS environment. This meant that we have Hive Tables that are globally accessible from any EMR we raise. This is much more efficient than having spark read a path from s3 where our files are stored, since in the case where you have a large number of files, it actually needs to scan the header information of each file before you can get to work. Instead, we can create the EMR with one extra parameter and then create our spark session with hive enabled. Once we do this we can access all our athena tables directly from spark code.
The first necessary change is to add to the emr creation script the following:
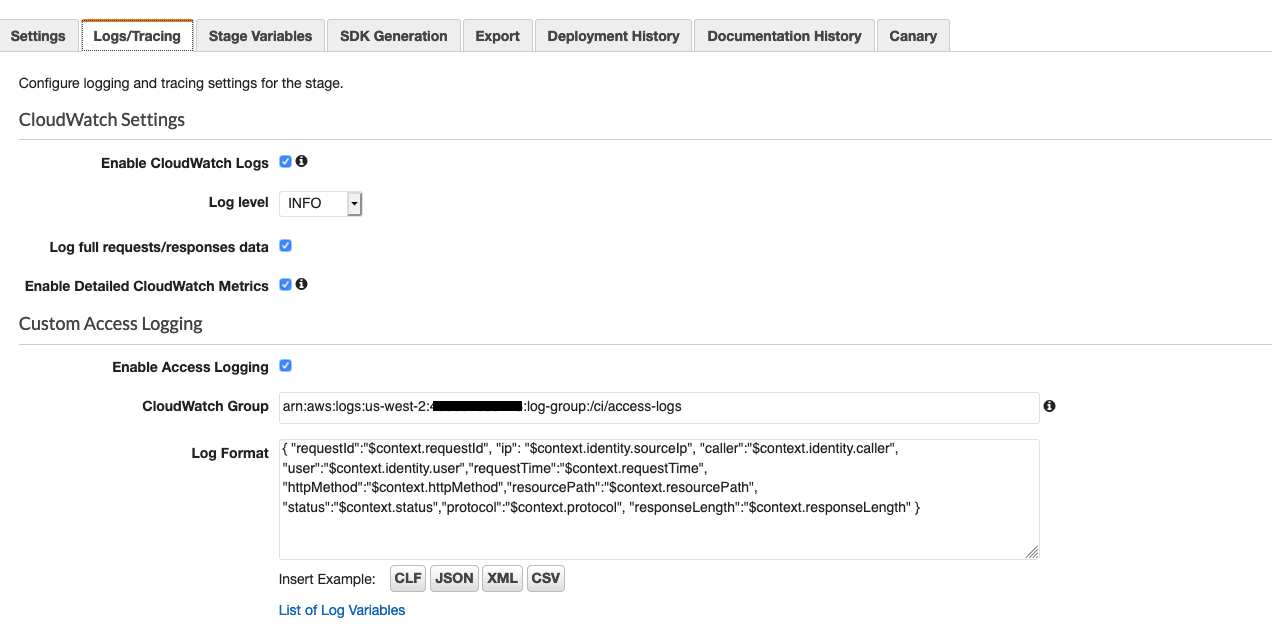
Recently, AWS released a new feature called CloudWatch Logs Insights. This feature allows us to easily write queries on CloudWatch Logs and create dashboards out of them. We leveraged this features to enable us to easily monitor our API Gateway access logs, to see a breakdown of all 4xx and 5xx statuses returned by our APIs. In this post, I will outline the steps necessary to make this happen.
The first thing to do is to enable logging in your API Gateway. If you are using AWS SAM Cloud Formation you will not be able to automate this step at this time. Instead, using the Console, go to your API Gateway pages and select stages on the left. Then select the stage of your deployment you wish to have logs for. Then select the Logs/Tracing table and enable logs in JSON format by clicking on JSON.
You will also need to specify the ARN of your log group. If you don't know it then you can easily find it by selecting logs in CloudWatch. Then edit the columns you see to include the ARN.
Once you have specified this, you will begin to have access logs sent to the ARN you have set up.
Since you have chosen JSON format CloudWatch Insights will automatically be able to identify the fields and help you to write queries. From the Cloudwatch Logs console you can click on explore and then you can start to play. Here are few queries we used to get you started, which help us break down our 5xx errors:
filter status >= 500 and status <= 599 | stats count(*) as count by resourcePath as url, status, bin(5m)
This simple line allows will only look for requests whose status is 5xx and then display the url, status, time in 5 minute intervals and the number of such requests that appeared during that interval.
Once you have this you can click on the button "Add to Dashboard" so that you can have a dashboard to track this data.
And if you just want the dashboard without playing here is a CloudFormation template you can use:
Recently we have transformed our AWS based servers to AWS Fargate. One of the challenges we have faced is how we can provide properties in a secure way to our serverless docker instances. Our Spring/Java based servers use @Value injection for many of our properties including sensitive data like database passwords. Until now we have used Spring config property files. There are encryption solutions like Jasypt that work well if we have access to a volume on our EC2 instance. However, when using fargate we are serverless with no such access.
The first choice as a team that is heavily invested in spring would be dockerized instances of Spring Cloud Config but first we wanted to see what AWS service we could use to simplify things. We found the AWS Parameter Store. As the documentation indicates, AWS parameter store provides "secure, hierarchical storage for configuration data management and secrets management". We have the ability to control access to the keys using AWS IAM Roles. We also have simple key management of the encryption using AWS KMS as well as a built in audit log of changes.
The only challenge left for us was to integrate the reading of the Parameter store into our application as an out of the box replacement for the PropertyPlaceholderConfigurer we have used to inject environment based properties until now. I will outline below the steps we did to do this.
The first part of the project was our SSMClient class to wrap all calls to the Parameter Store. As you see in the comments, this class wraps the AWS API to retrieve parameters from the parameter store, including retrieving all the environment parameters and stripping off the prefix. As you see in the code we cannot retrieve all the parameters in one shot and need to loop until we retrieve them all using the token returned on each call. AWS will only return a maximum of 10 elements in each call.
The next step was to use this class and implement our own PropertyPlaceholderConfigurer. Here is the code we used for this. As you see in the code, at the time this code is called we do not have a fully autowired SSMClient to work with so we need to do this manually. So we create our SSMClient and inject the dependencies we need, manually call our PostConstruct function. After this we have our properties to pass to the base class and make them ready to inject in all the @Value parameters we have. To use the bean we just add it to our @Configuration or to the Application Context xml as you need.
In my small Spring project, i have a value that i may need to change of on of my parameters. The simple solution would be
@Value("${myParam:defaultVal")
private String myParam;
Yet it was not working and the value was coming out as "$myparam:defaultVal".
What's the issue?
Eventually i stumbled upon the issue via this spring issue. I also saw it addressed here although there is a mistake as it is not sufficient to use util:properties as explained here. So, to make this work if you are using XML just add this in:
Yes, I still use Groovy upon occasion. Groovy still is more readable and elegant in a lot of instances even than Java 8.
Ok but let's say i am writing both java and groovy in the project
In order to have this work, you need to configure your Gradle project with the following small changes so that you can make it compile the mixed code.
You need to make all the code compile as Groovy code (even the Java code).
So, add the following lines to your project:
If you are new to Akka Logging and are used to using Log4j, there is a good chance you will get the error "WARNING arguments left: 1", and not know where its coming from.
So, here it is:
In log4j, you maybe used to writing:
logger.warn("Exception caught: ", e);
This is perfectly valid and works fine. If you use this line in akka logging, you will get the error "WARNING arguments left: 1" because in the case of logback, the syntax assumes it is filling in params from the string, so it expects this:
logger.warning("Exception caught: {}", e);
Hope this will help all of us (including me) not to get caught by this again....
The other day i was looking for a simple way to take some Strings and automatically capitalize the first character. I stumbled upon Springs StringUtils and as it turns out it has a lot of nice utility functions.
Check them out: http://docs.spring.io/spring/docs/current/javadoc-api/org/springframework/util/StringUtils.html
There are many nice simple things that we need to do all the time:
capitalize (first characters)
uncapitalize
Lots of utilities for String arrays -- adding to them, sorting etc
When I first got involved in using mocks, I viewed them as a necessary evil since I had some dependencies in my class and if don’t use a mock, I will suffer NPE’s in my tests.
However, as I started using them and learning their power, I have seen that I can really use mocking in ways that enhance my unit tests. Here is a concrete example. I am using Spring Data JPA. So, I need to mock the save of my entity when it gets created in the function that I am unit testing. However, once I am mocking I can easily also validate the parameters sent to this function that did the save. Using Mockito, we use the ArgumentCaptor, to do this validation as follows:
MyRepository myRepository = mock(MyRepository.class);
ArgumentCaptor<EntityClass> argument = ArgumentCaptor.forClass(EntityClass.class);
//... invoke function to unit Test that will internally save Entity
verify(myRepository).saveAndFlush(argument.capture());
EntityClass entity = argument.getValue();
assert entity.getName().equals(“name”);
assert entity.getAddress().equals("address");
This now means my unit test has validated that all parameters passed to the function were passed to the database.
Now we see some real added value in the mock, where we can be confident that our copy of the data to the entity we are persisting has not missed any of the parameters.
Another nice feature in mocking is checking how many times a function is invoked. Modifying the the code above:
MyRepository myRepository = mock(MyRepository.class);
ArgumentCaptor<EntityClass> argument = ArgumentCaptor.forClass(EntityClass.class);
//... invoke function to unit Test that will internally save Entity
verify(myRepository,times(1)).saveAndFlush(argument.capture());
EntityClass entity = argument.getValue();
assert entity.getName().equals(“name”);
assert entity.getAddress().equals("address");
You can find lots of issues discussed on the ‘net about the problems of the Calendar/Date classes in Java. Here are a few that recently reared their ugly head in our code:
1. This one is actually not in either of these but in trying to output our Date. Beware of the mm instead of MM when using SimpleDateFormat. Yep, one of my team members used the following code:
SimpleDateFormat sdf = new SimpleDateFormat(“yyyymmdd”);
Surprisingly everyone in our tests had a birthday of the first of the month! I think that the right solution would be that mm is wrong and mi is minutes and mo is month. This would solve the confusion.
2. Did you know that there is a difference whether you use Calendar.HOUR or Calendar.HOUR_OF_DAY? Ok, i admit it this one is documented in the javdocs, but i would still think that it is a bit of surprise that in the afternoon, if you do
cal.set(Calendar.HOUR,0);
that you will get 12:00 PM!
3. Why does toString() of Calendar not put out the date in some format?
4. Beware that DAY_OF_WEEK is not zero based while MONTH is.
When processing large XML files, it is impossible to build a DOM of the whole file as you are sure to run out of memory. Java 6 includes StAX (it was around earlier of courser) and it is the best solution to deal with large XML files to build a scalable XML file processor. However, it still may be desirable to build a Document Model when processing an individual record due to decisions in code that may need to be made based on information lower in the node. Due to this requirement, we use StAX to extract each record from our gargantuan XML files and then pass to a different class that builds a DOM for the processing the record. Here is the very simple code with explanation of what we did.
14://function to allow us to read part of a document that does not include the header
15:publicvoid setHeaderRead(boolean val) {
16: headerRead = val;
17: }
The above is some boilerplate code needed for our class. The heavy work is the XMLEventReader, created in the openStream function on line 7.
Following this we have two main functions. The first is used to read the open XML tag of the document and any important attributes in this tag, and the second is to read an actual record. Since the class is written to read recursively all sub elements of a record, it is important that we not read the open XML tag of our document as a regular record, since that will mean we wind up reading our entire document as one record! However, since there may be need to work on part of a file, i allowed an override on line 15 above so we can skip reading the header. The open XML tag is obviously not a complete XML tag so we do some heavier work here, returning the attributes as a map for use by our application, in addition to the raw line which can be used upstream in our application.
Here is the actual code:
1:/**
2: * Since header is not a complete element we need to do special treatment so we will read the header attributes
3: * into a hashmap to save all the attributes besides returning the raw data
4: *
5: * @return the rawData of document start and header
We use an enum to give us maximal information about what was read while return the actual raw data in a StringBuffer that is allocated outside our function.
Of course, you could do ALL the parsing in your StAX implementation as well, as described here and other places, but this code allows us to continue to use the more elegant DOM for our actual work.
We have all been hearing how the programming paradigm has started to change, in that Moore’s law will no longer bail us out to speed up our applications and instead we we need to program better to use our multiple processors. Many have been pushing the Actor Model as the simplest way to get to solid multithreading without locks, etc. And for that reason, we are getting pushed to use Scala and other languages instead of Java. But you can also use these frameworks in your existing Java application so i figured i would give it a spin using Akka, unfortunately postponing yet again my first application in Scala. For a starter, my app just needs to run a job asynchronously with no response, but this would be enough to familiarize myself with Akka and see how to use it.
So, after downloading Akka, the following dependencies are needed to get started:
Now, we can write a small class. Here is the code to send asynchronous messages and not get a response back.
Line 16 shows the code to launch the thread as we “start’ the class and then send the message. In this case we sendOneWay but other methods include sendRequestReply, and sendRequestReplyFuture, as you can see in the documentation.
When you run this application you will see that it launched 16 threads and uses them for the 50 jobs. I found it nice that it was expressive – sendOneWay, as well as to access the context to end the activity of this object.
The next step was learning how to customize the behavior of my thread pool, which led to this change to the application:
18:final MessageDispatcher d = Dispatchers.newExecutorBasedEventDrivenDispatcher("dispatcher").withNewThreadPoolWithLinkedBlockingQueueWithCapacity(50)
26: ActorRef actor = Actors.actorOf(new UntypedActorFactory() {
27:public UntypedActor create() {
28:returnnew MyActor(d);
29: }
30: });
31: actor.start().sendOneWay(i);
32: }
33:
34: Thread.sleep(50000);
35: }
36: }
As you see, on line 18 we create the ThreadPool, in Akka terminology called a MessageDispatcher. There are a few different kinds as mentioned here. But this change means that we now need a constructor to receive this dispatcher for use. (Don’t worry Spring integration is not a problem to use DI for the actors).
And voila, we see in the printouts that indeed this is running in multiple threads. Of course, for the need of one way with no reply, there really is no need to use Akka since the code is pretty straightforward using plain old Spring + Java as follows, where we define our ThreadPool bean in the application context:
Once we have this, use of the code to do the same things just involves: taskExecutor.execute(bean). So, in this specific instance, the overhead of adding the scala and akka jars would not be justified, but clearly for more significant multithreaded needs, this could be a powerful tool to simplify code and make it very readable.